This is a small plain guest bathroom. The walls are painted a Farrow and Ball color "Lullaworth Blue." Pretty color but not very exciting. The adjacent bedroom is finished in a rich brown, blue foil, and custom gold Lusterstone. The bed frame is a bronze metal rubbed with dark brown and black and the quilt (a gift from my mom) is pale cream with rich russets, gold, and bronze Japanese fans. The quilt is trimmed in a deep blue. Against the bedroom's saturated earth palette, this bath fell flat.
This is a close-up of the wall and bed frame finish. The Willow Stencil is from the Mad Stencilist.
Bruce removed a built-in medicine cabinet that was ugly and non-functional. I primed the patch and painted the entire room with the new Dark Brown Sharkskin. Dark Brown Setcoat would work in this application-I used Sharkskin to test the coverage of the new product. Less then a quart covered the paint in 1 layer. If more of the base showed in the final result, I would've rolled another coat.
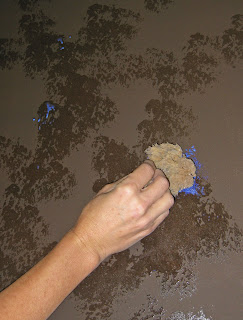
I rolled the Sharkskin in the morning and could apply my Wunda Size by the afternoon. Here I am spotting in the Wunda Size with a Sea Sponge. The Wunda Size may leave some texture-that is desirable. I created connected areas leaving 70% of the base color showing. The Wunda Size should set-up at least 1 hour.
When the Wunda Size is tacky but not wet, I applied the Caribbean Blue Foil. The pretty side should be facing you and scrub the surface hard with a Robert Brush or a stiff dish washing brush. Once the foil is applied, you can go right to the next step. I buttered a blade with Cocoa Lustersuede and popped it on the wall in connecting areas making sure to leave some of the foil visible 100%. In other areas, I tight trowed down the popped Lustersuede so the foil tops barely peeked through the Lustersuede.
You can see in this picture that 20% of the Dark Brown base color and 20% of the foil are still visible .
And here is a close-up of this layer. Lustersuede dries much slower and is thinner then Lusterstone. It also costs $5 less per gallon. Since I don't want to create product build with this layer-Lustersuede is the better choice for this finish. This layer must dry over-night.
Once the Lustersuede is dry, I use a brush to spot in Bright Gold Faux Metal straight from the bottle. Faux Metal is real metallic shavings in alcohol. If the Lustersuede is damp, the Faux Metal will tarnish. Use the brush to create highs and lows with the Faux Metal-this stuff sets slow.
After I apply the Faux Metal to an area about 3'x3', I use a trowel, flat to the surface, and I "smear" the Faux Metal. Make sure that you don't bury out all the Dark Brown base, Blue Foil,or the Cocoa Lustersuede.
The Faux Metal needs to dry over-night. The material dries opaque and with a wonderful true low metal sheen. Since I want to glaze this finish, I seal the surface with C500 Gloss and wait 2 hours before I start glazing.
I brushed on at the same time Dark Brown Faux Color and Dark Brown Faux Creme Color mixed with Aquacreme. A terry towel or rag is used to pat out and soften the glazes. The glaze tints all layers at the same time and helps bring the whole surface together.
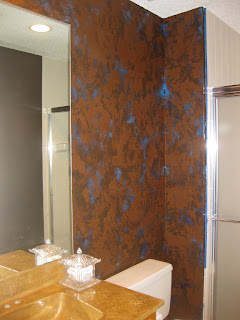
The finished wall. I selected Antique Brass switch plate covers and they blend well.
To compliment the walls, I added some modern artwork that includes all the metallics in the room (dirty gold, brass, and brushed nickle) and blues found in the foil and the adjoining bedroom.
This finish looks rich and makes the room glow. It is simple to accomplish and takes less then a quart of every product used. I needed less then 1 roll of foil. Economical but looks high-end-what more could anyone want in a finish?


No comments:
Post a Comment